
Quick Overview: How Staining and Sealing Protects a Wood Deck
Staining and sealing a deck helps protect wood from moisture, sun damage, and everyday wear while improving its appearance. Regular treatment extends the lifespan of a deck and reduces the risk of costly repairs.
- Moisture protection prevents rot and decay: Sealers block water absorption that leads to mold, mildew, and wood damage
- UV protection reduces fading and cracking: Stains help shield wood from sun exposure that causes discoloration and warping
- Surface treatment improves safety and comfort: Properly sealed boards reduce splintering and roughness
- Routine maintenance extends deck lifespan: Reapplying stain and sealer slows aging and structural deterioration
Consistent staining and sealing keeps a deck looking better, lasting longer, and performing safely in all seasons.
When and Why Deck Maintenance Becomes Necessary
A freshly stained and sealed deck not only looks great, it also helps protect your outdoor space from weather damage, wear, and aging. Whether you’re tackling this as a DIY project or considering hiring a pro, knowing when and how to stain and seal your deck can make all the difference in keeping it in good condition year after year.
Benefits of Staining and Sealing Your Deck
After deck installation, you only need to apply stain to a wood deck, as vinyl and composite aren’t affected by the elements in the same way. Deck stain and sealer protect the wood and help provide several benefits. Some of the most notable being the following:
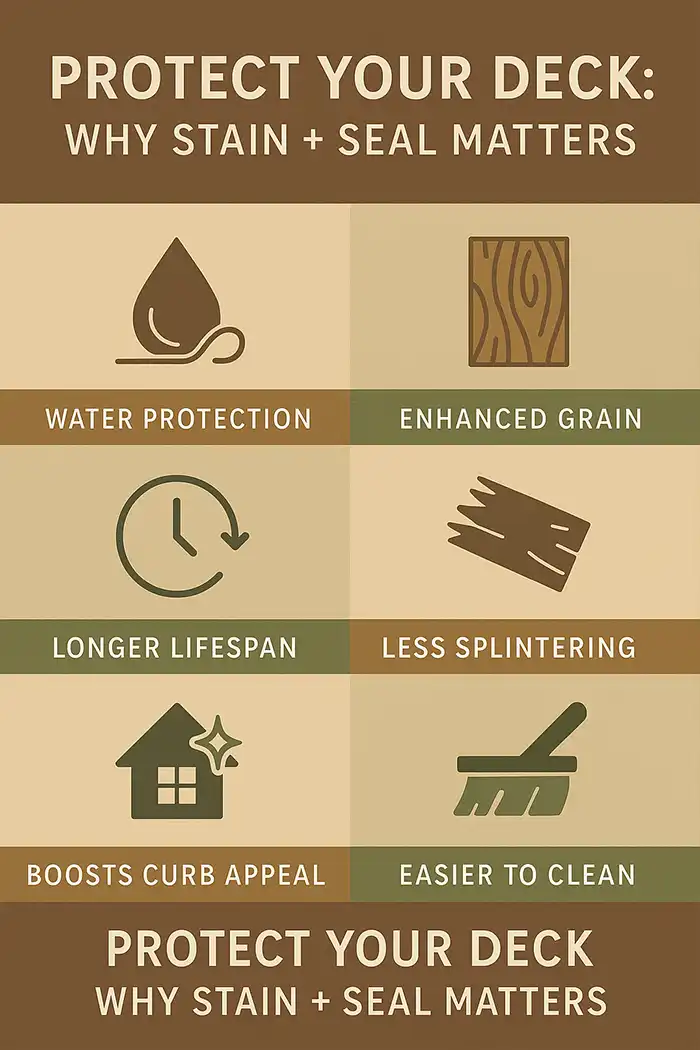
Protects against water damage: Helps prevent moisture from seeping into the wood, reducing the risk of rot, mold, and mildew.
Shields from UV rays: Minimizes fading, cracking, and warping caused by sun exposure.
Enhances natural beauty: Brings out the wood’s grain and gives your deck a rich, finished look.
Extends the life of your deck: Adds a protective layer that helps reduce wear and tear over time.
Reduces splintering and roughness: Keeps the wood smoother and safer to walk on barefoot.
Improves overall curb appeal: A well-maintained deck can boost your home’s appearance and value.
Makes cleaning easier: A sealed surface is more resistant to stains, grime, and buildup from dirt or pollen.
How Often Should You Stain and Seal a Deck?
You’ll need to regularly stain your deck if you have materials such as cedar, redwood, and even pressure-treated lumber. If you’re not sure what kind of decking material you have, contact a professional for the best results.
You’ll want to repeat this process every few years, depending on what you’re using and you’re desired results. Applying a wood stain every two to three years can help keep the color vibrant and the materials protected, but this can vary based on where you live. Some factors that may require more frequent staining include:
✔ Climate and sun exposure
✔ High foot traffic and use
✔ The type of wood
✔ Quality of previous treatments
You’ll also need to seal your deck every one to three years, depending on the type of sealant used, UV exposure, and the amount of rain you experience. Without adequate sealant, rain can soak into the wood and start causing damage such as rot or decay.
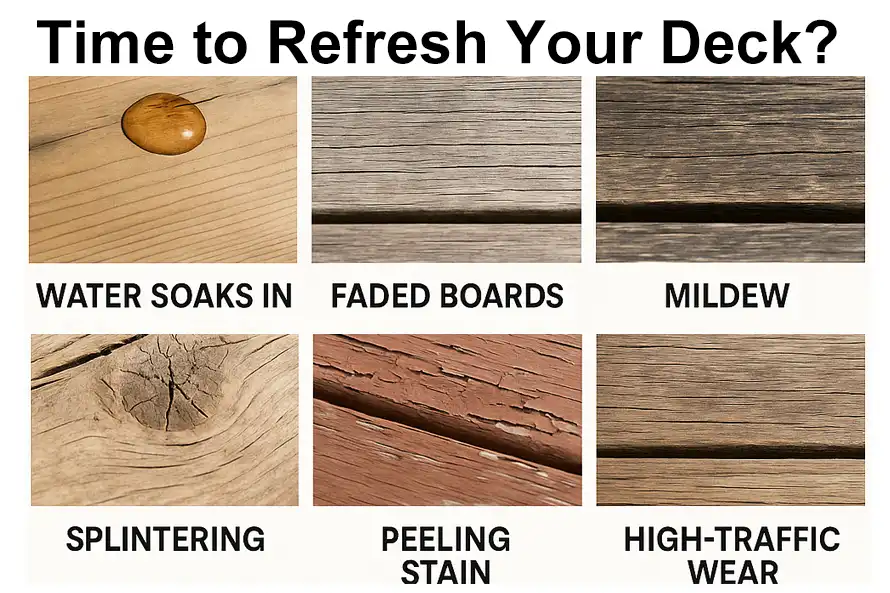
Signs It’s Time to Update Your Stain or Sealer
✔ Several indications can signal that it’s time to treat the surface of the deck. Some of these include:
✔ Water no longer beads on the surface and instead soaks into the wood.
✔ The deck boards look faded, dull, or uneven.
✔ Wood feels dry, rough, or is starting to splinter.
✔ You notice mildew, mold, or green algae growth.
✔ The existing stain is peeling, flaking, or wearing off in patches.
✔ High-traffic areas look more worn or weathered than the rest of the deck.
How to Stain and Seal a Deck: A Step-by-Step Guide
If you want to stain a deck, you’re going first to need to gather a few supplies. You’ll need things like rags, tape, plastic, and the stain and sealant themselves. Some types of stains have premixed sealants within them, while others will require a second coat of sealant on top of the stain. Regardless, here’s a guide to help you tackle this as a DIY home improvement project.
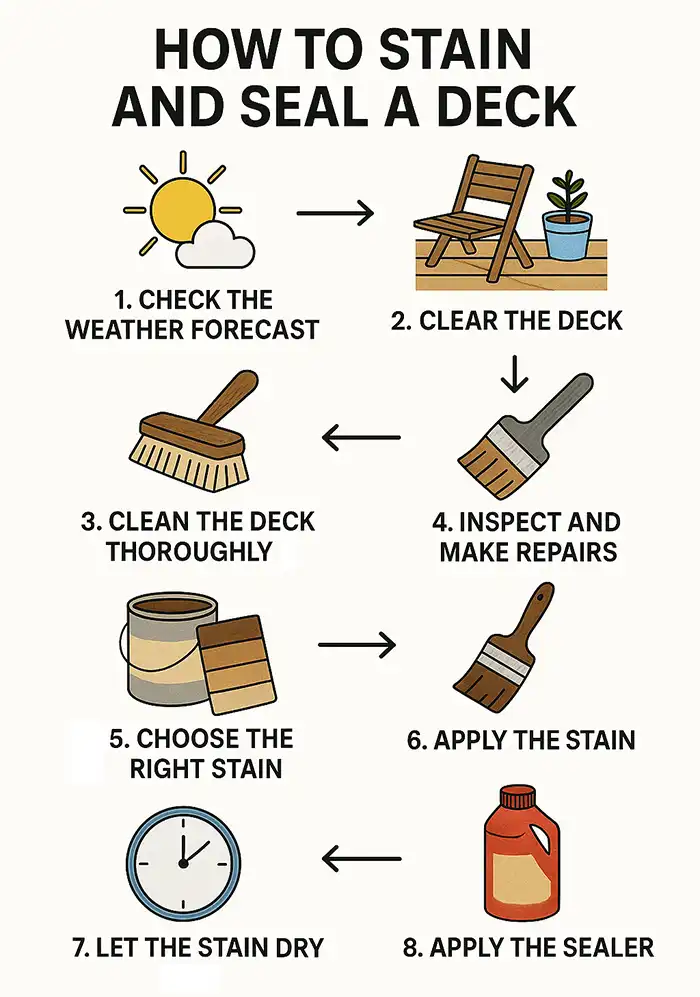
1. Check the Weather Forecast
Before you begin, make sure you have a few days of clear, dry weather ahead. Staining and sealing require dry conditions and temperatures between 50°F and 90°F, and the deck surface can take a few days to set fully, so timing is everything. You’ll also want to try to avoid excessively humid days, as the moisture in the air can interfere with drying and the overall finish quality. On the day that you decide to stain and seal the deck, plan to start early to maximize daytime drying time.
2. Clear the Deck
Next, you’ll want to clear the surface of the deck. Remove all furniture, plants, grills, and anything else that might be in the way. Even small items should be removed, as this makes things a lot easier once you start the process. Once all household items have been cleared, sweep off any leaves, dirt, or debris so you’re starting with a good base.
3. Clean the Deck Thoroughly
After clearing the deck, it’s important to clean the boards thoroughly. Use a wood cleaner or brightener with a scrub brush to wash the surface. If you’re not sure how to apply deck cleaner or which brand to use, ask your local home improvement store for a recommendation based on the type of decking material you have.
For a deeper clean, you can use a pressure washer. However, it’s important to avoid using it at the highest level, as intense pressure washing can damage certain types of wood. Once you’ve thoroughly washed the surface, allow the deck to dry for at least 48 hours before moving on to the next step.
After letting the deck dry, many professionals recommend using a sander to remove remaining residue. Sanding the deck also helps open up the wood grain, which can make for better stain adhesion over the years.
4. Inspect and Make Repairs
After cleaning and sanding, you should be able to easily identify any areas of the deck that may need repairs. Walk around the surface and check for any boards that are cracked, loose, or rotting. Replace any damaged boards, and sand down any splintered areas or rough patches. You’ll also want to tighten or replace any loose screws or nails while you’re at it. If you think there are any significant damages that could compromise the structural integrity, it’s best to contact a professional.
5. Choose the Right Stain and Sealer
There are different types of stains you can choose from, such as:
Transparent (Clear) Stain: This is used to highlight the natural appearance of the wood, but it offers minimal protection, which can shorten the lifespan of the deck.
Semi-Transparent Stain: This offers more UV and water protection than clear, while still focusing on the natural grain of the wood.
Solid Stain: This is a solid coloring that mimics deck paint, hiding the wood grain. Although it offers the most protection, it’s also the hardest to remove.
For sealers, you’ll typically choose between water-based and oil-based options. The right choice will depend on your wood type, local climate, and the look you’re going for.
However, you should always test the current stain to make sure that you use a similar kind. For example, you can’t (or at least shouldn’t) put a water-based sealer over an oil-based finish. To do this, apply a small amount of deck stripper to an area, wait 15 minutes, and then wipe it off. If the stain comes off, it’s water-based and should be removed from the entire surface. If it doesn’t come off, it’s oil-based, and the new layer can go right on top after cleaning.
6. Apply the Stain
Once everything is dry and prepped, stir your stain thoroughly (don’t shake it, as shaking can create bubbles). Apply the stain using a brush, roller, or sprayer, working in small sections for an even coat. Always brush or roll in the direction of the wood grain, and be careful not to overapply. Wipe away any excess as you go to prevent sticky spots or blotchy areas, and don’t forget the railings.
7. Let the Stain Dry
Allow the stain to dry thoroughly before sealing. Depending on the type of product you’re using and the weather conditions, this could take anywhere from 24 to 48 hours. Be sure to check the manufacturer’s recommendations for exact drying times.
8. Apply the Sealer
If your stain doesn’t already include a sealer, now’s the time to apply it. Use a brush or roller to apply a thin, even coat across the surface of the deck. Pay special attention to seams and edges to make sure they’re fully covered. Once applied, give the sealer time to cure (usually another 24 to 48 hours) before moving furniture back or walking on the deck.
How Much Does It Cost to Have Your Deck Stained and Sealed Professionally?
On average, it costs about $0.50 to $1 per square foot to DIY staining and sealing, or about $1.50 to $4 to get it professionally done. Still, using deck sealant correctly can protect your deck for years to come and help minimize costly repairs.
So, if you’re ready to give your deck a fresh new look and years of protection, but aren’t sure where to start, contact First Star Exteriors today for a free consultation. Our expert team will handle everything from prep to finish, ensuring professional results that last. Don’t wait until damage occurs; let us help you protect your outdoor space.


